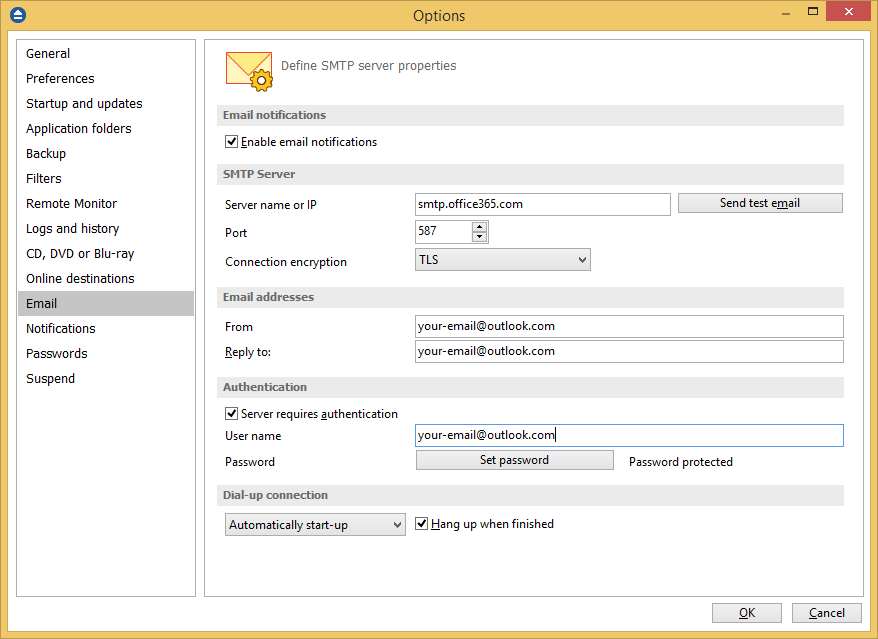
This article explains how to configure the SMTP server settings for Office365 in order to send notifications emails from Backup4all.
On this page:
- How to configure Office365 SMTP server in Backup4all
- How to enable email notifications in Backup4all
How to configure Office365 SMTP server in Backup4all
If you want to use Office365 as SMTP server, please follow the steps bellow to configure it correctly in Backup4all.
- Open Backup4all
- Go to File->Options->Email
- Select Enable email notifications checkbox
- On "Server name or IP" enter smtp.office365.com
- For "Port" number enter 465 for SSL, or 587 for TLS encryption.
- From the "Connection encryption" dropdown list, select SSL or TLS
- In the "Email address" section, enter your Microsoft email address for both From and Reply-to fields. If you don't have an account, you can create one here: https://www.microsoft.com/
- In the "Authentication" section, select Server requires authentication and enter your Microsoft email address and password.
- Press "Send test email" button, enter your email and press OK. You should get a successful message.

If for some reason you get an error message, please look at the last part of the message, there should be some indications about the problem. Here are few possible messages:
- *Incorrect email and password*In such a case, please re-enter the complete email address and the correct password.
- *An error occurred while sending mail. The mail server responded: 5.3.4 554 5.2.0 STOREDRV.Submission.Exception:OutboundSpamException; Failed to process message due to a permanent exception with message WASCL UserAction verdict is not None. Actual verdict is HipNotify, ShowTierUpgrade. OutboundSpamException: WASCL UserAction v. Please check the message and try again.*In this case, you need to first confirm your office365 email account. To do that, just login to https://outlook.live.com with your email and password. A phone number for confirmation will be required.After the account is confirmed, you can try again to send a notification test email from Backup4all.
How to enable email notifications in Backup4all
- Open Backup Properties -> Email
- Enable Send emails checkbox
- Enter your email in the Send emails to section
- Select if you want to also attach the log to email.
- Press Save


