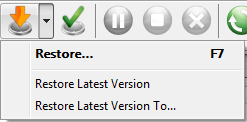
To make a full or a filtered restore start the Restore Wizard by pressing the Restore (or F7) button from the application's toolbar. You can restore to the original location or to a different location of your choice.
On this page:
- How to make a simple restore of the latest version from a backup
- How to make an advanced restore
- Video tutorial how to restore data with Backup4all
With Backup4all you can do the following restore operations:
- restore the latest version of all files
- restore all files as they were on a specified date
- filtered restore
- restore all files from a folder
- restore the latest version of a particular file
- restore the latest version of multiple selected files
- restore any version of a particular file
How to make a simple restore of the latest version from a backup
To make a full or a filtered restore start the Restore Wizard by pressing the Restore (or F7) button from the application's toolbar. You can restore to the original location or to a different location of your choice.
You can restore the latest version of a file, several selected files or all files from a folder by selecting the files or folder in the Explore View, right-click and select Restore Latest Version or Restore Latest Version To...
If you want to restore a particular file version, switch to the Explore View, select the targeted file in the tree, right-click on a file version from the bottom list and choose Restore or Restore to...
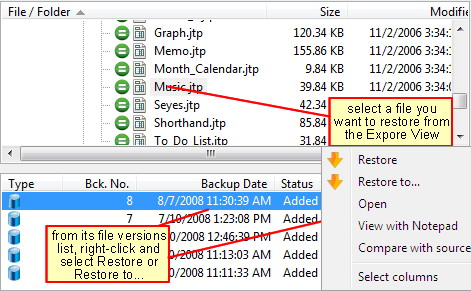
Beside files, folder information is also added to backup, so a restore process can recreate the original folder structure.
How to make an advanced restore
Step 1
Using the Restore Wizard you can restore from a backup job. In the first step you can choose the destination, the priority of the execution and customize the restore operation if you wish.
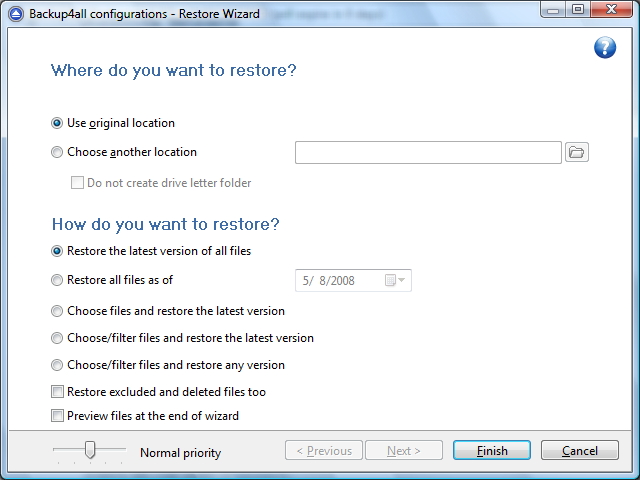
In Where do you want to restore? section, you can select the original location or indicate a custom one.
Use original location
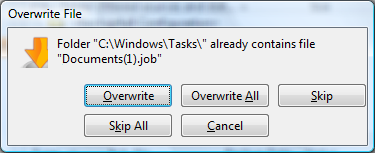
Copies the files from the zip backup into the original location. If a file with the same name already exists, a dialog will be shown prompting for an action before the restore can continue.
Choose another location
Copies files from the zip backup to a different folder. If selected, you can choose a different folder to restore files from the backup.
If Do not create drive letter folder option is checked, Backup4all will restore the files in the designated location using the original directory structure. If you select this option and you have files from multiple drives, some files might get overwritten. For example, if you backed up your Documents and Settings folder from your C drive, when you restore it to a different location having the Do not create drive letter folder unchecked, Backup4all will first create a folder named C and in it place the Documents and Settings folder. If you would have checked the Do not create drive letter folder option, the folder named C wouldn't have been created.
In How do you want to restore section, you can select:
Restore the latest version of all files
Backup4all will restore the latest version for all the files in the backup.
Restore all files as of
Choose the date to which you want to restore the files. The restored files will be exactly as they were on the selected date.
Note: If you used the Limit number of file versions option, restoring the files as of a specified date could not restore all your files if some of them were deleted by the file version limitation.
Choose files and restore the latest version
Backup4all will restore the latest version for all the files in the backup. You will be able to filter the files using the Preview page.
Choose/filter files and restore the latest version
Backup4all will restore the latest version of the files. Files that are excluded from backup are not restored. Check the status of the files in the Explore view of the main screen.
Choose/filter files and restore any version
Lets you specify which version of the files will be restored. For example, you might restore all files in their original state from the first backup number.
Restore excluded and deleted files
If this option is checked, the latest version of all files will be restored, even if these files were excluded from the backup.
Preview files at the end of wizard
If checked, a preview page with the files to be restored will be shown at the end of wizard.
Using the slider from the bottom of the Restore Wizard window, you can set the restore execution priority compared to the rest of the running processes on your system. For example, setting the priority to Highest priority, will determine the system to allocate most of its resources for the restore execution.
Step 2
This is the second step of the Restore Wizard. It appears only for Choose files and restore from the latest version, Choose/filter files and restore the latest version and Choose/filter files and restore from any version options.
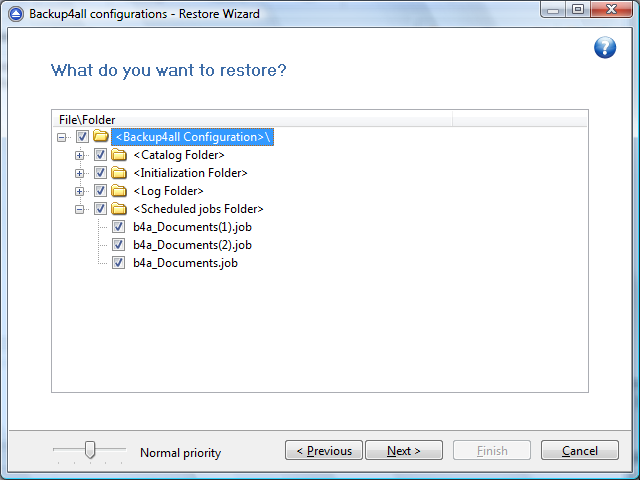
You can uncheck the files you don't want to restore. By default, all files are checked.
The file versions in the list can be sorted by clicking on the column headers. The right-click menu on the column header provides a handy way to show/hide unnecessary columns (except the File/Folder column which is grayed out).
Step 3
Indicate to what date do you want to restore the backup.
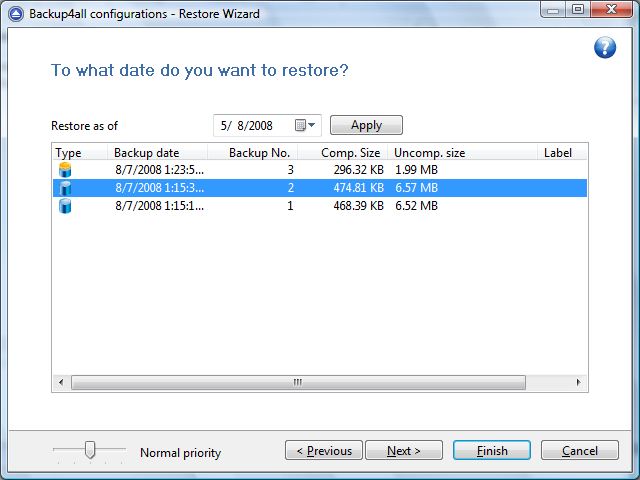
Restore as of
This option allows you to restore your files and folders to a specified date. Just select the data, press Apply and then press Finish.
The purpose of this step is to let you select versions to restore. Use left mouse clicks together with SHIFT and/or CTRL keys to select several backup numbers to restore. The most recent version of a file in the selected backup number will be restored. If you select all backup numbers, then a full restore is performed just as the Choose/filter files and restore the latest version restore option.
Note: If you used the Limit number of file versions option, restoring the files as of a specified date could not restore all your files if some of them were deleted by the file version limitation.
If you use the Mirror backup type, the Restore as of feature is not available. The Mirror backup type does not keep track of file versions. Only the last version is available for restore.
Step 4
On this page you can filter the files to be restored.
Its behavior is the same as the Filters page of the New Backup Wizard or the Backup Properties window, except that the process is restore and not backup.
The Filters page defines files filters to be applied to files that are going to be restored. Only files and folders that match the filters will be restored.
You can add include or exclude filters. By default all files are included in the list to be restored.
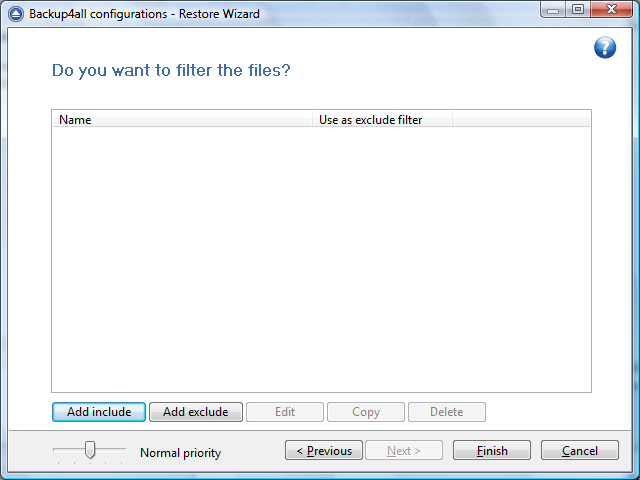
The system selects only files that match the include filter and do not match the exclude filter. This means the exclude filter is more powerful: if a file satisfies both include and exclude filters, it will not be processed by the system.
Include and exclude filters are composed from filter restrictions:
- two or more filter restrictions in the include filter means that a file must satisfy at least one restriction to be restored.
- two or more filter restrictions in the exclude filter means that a file must satisfy any restriction to be excluded.
You can manage filter restrictions using the buttons:
- Add include - this will open a new window from where you can add a new restriction to the list of include filters.
- Add exclude - this will open a new window from where you can add a new restriction to the list of exclude filters.
- Edit - will open the same window as Add, with the selected filter's properties. You will be able to modify the selected restriction.
- Copy - will create a copy of the selected filter.
- Delete - will delete the selected filter from the list.
- Change to Include/Exclude - will change the filter from include to exclude or from exclude to include.
Step 5
This page is the final step of the Restore Wizard. It appears only if the Preview files at the end of wizard option is checked. The purpose of this step is to show a preview of the files that will be restored. If any other customization is required, user must go back and reselect the files to be restored.
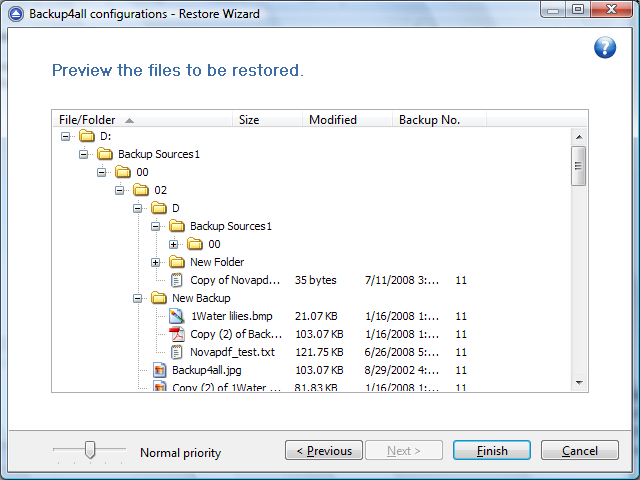
For the Choose/filter files and restore any version restore type, files and folders shown in the tree are calculated based on selected backup versions. Files that have not been backed up in the selected backup versions or were filtered will not be shown in the tree. Selecting all backup versions in the Choose/filter files and restore any version restore type is the same as using the Choose/filter files and restore the latest version type.


